
Looking to improve the acoustics of your space but not keen on leaving behind a battlefield of screws, nails, or plasterboard carnage? You’re not alone. If you’re renting, setting up a home studio, or just trying to cut down the echo in your living room, installing acoustic panels for walls is absolutely doable and surprisingly straightforward.
So, if you’re after better sound without the mess or landlord drama, keep reading.
Why Bother with Acoustic Panels?
Acoustic panels aren’t just for recording studios or high-end conference rooms. They’re becoming increasingly popular in homes, flats, offices, classrooms — anywhere echo and noise are a problem.
These panels absorb sound waves, reduce reverb, and help create a more controlled, comfortable environment. No matter if you’re on Zoom calls all day, recording podcasts, or simply tired of hearing every word your flatmate says from the next room, acoustic panels can make a noticeable difference.
Think of them as noise-cancelling headphones for your walls — functional, stylish, and far more discreet than bulky soundproofing gear.
The Problem: Installation Without Carnage
Traditionally, acoustic panels are mounted using nails, screws, or construction adhesives. Effective, sure — but these methods tend to leave permanent scars on your walls. Not ideal if you’re renting, planning to redecorate, or just don’t fancy repairing half the wall later.
Thankfully, damage-free installation is not just possible — it’s becoming the go-to choice for smart DIYers and renters alike.
What You’ll Need (No Power Tools Necessary)
Here’s your toolkit for a clean, damage-free acoustic panel wall:
- Lightweight acoustic panels – foam or fabric-wrapped ones are best
- Command Strips or heavy-duty Velcro strips
- Removable adhesive hooks
- Picture-hanging strips (rated for at least 7–8 kg if your panels are heavy)
- Measuring tape and level
- Painter’s tape or a pencil for layout
Quick Tip: For heavier or custom-built panels, consider magnetic mounts or French cleats with wall-safe adhesive — they offer better support without the screws.
Step-by-Step Guide to No-Damage Installation
1. Plan Your Layout Like a Pro
Start by measuring the wall and deciding on a layout. Use painter’s tape to outline the placement of each panel. This makes it easier to visualise the final look and helps you avoid unnecessary repositioning later.
Focus on spots that cause the most sound reflection — typically, flat walls behind your desk, bed, speakers, or television.
2. Test the Adhesives First
Different wall surfaces (paint, wallpaper, textured finishes) can react differently to adhesives. Stick a sample strip in an inconspicuous corner and leave it for 24 hours. Check if it peels off cleanly without taking paint or wallpaper with it.
This step could save you a world of pain later.
3. Mounting the Panels
Depending on what you’re using:
- Foam panels: These are the lightest and easiest to mount. Use a few Command Strips or Velcro strips on the back, press firmly to the wall for at least 30 seconds.
- Fabric-wrapped panels: These may be a bit heavier. Use adhesive strips in each corner and one in the centre. For extra stability, use adhesive hooks and mount panels like picture frames.
- DIY frames or art-style panels: If they come with hanging wires or D-rings, use adhesive hooks or a rail system. Keeps them off the wall surface entirely.
Make sure the panel is level before final pressing — once that adhesive sticks, moving it can be tricky.
4. Give It Time to Set
After mounting, leave the panels alone for a few hours to let the adhesive set properly. Most adhesives reach full strength within 24 hours, so avoid adjusting or nudging the panels during this time.
5. Test the Results
Once installed, stand in the room and clap, speak, or play music to test the difference. You should notice a distinct drop in echo and harsh reflections. If not, you may need more coverage or a different placement.
The beauty of using non-damaging methods? You can reposition as needed — no filler, sanding, or touch-up paint required.
Extra Tips for a Clean Finish
- Start small. Begin with a few panels and test the effect. You may not need as many as you think.
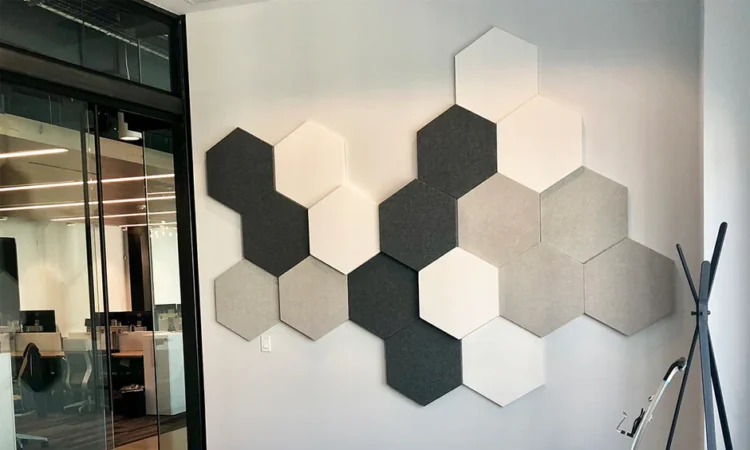
- Mind the gaps. Leaving small spaces between panels not only enhances sound absorption but also looks intentional, almost like wall art.
- Match the décor. Panels come in all kinds of colours, fabrics, and shapes now. Choose designs that blend in or even elevate the space.
- Consider corners. Corner bass traps can improve acoustics dramatically, especially in smaller rooms.
When to Call in a Professional
If you’re working on a larger space — like a media room, open-plan office, classroom, or commercial area — DIY might not be the best route.
Here’s when it makes sense to hire an expert:
- You’re dealing with high ceilings or awkward layouts
- You’re installing heavy, custom acoustic panels
- You need advice on placement, coverage, and performance
- You want a professional-grade finish with minimal fuss
Acoustic consultants or installers can assess the room’s acoustics, recommend the most effective solution, and handle installation using non-invasive techniques (e.g. brackets, rail systems, or tension-mount panels).
It’s also a solid option if you simply want it done fast — and done right.
How to Remove Panels Without Wrecking the Wall
Eventually, the panels will come down — whether you’re moving, redecorating, or switching up your setup.
To remove them safely:
- Pull slowly and gently, following the instructions for the adhesive used.
- Use a hairdryer to warm the adhesive if it feels stiff — this softens it and reduces the risk of paint damage.
- Clean any residue with a citrus-based cleaner or rubbing alcohol — nothing too harsh.
Done right, you won’t see a trace of the panels once they’re gone.
Final Thoughts: A Sound Investment, Without the Stress
Good acoustics shouldn’t come at the cost of your deposit, your paintwork, or your sanity. Whether you’re a renter looking to reduce echo, a content creator fine-tuning your sound, or just someone who appreciates a quieter space, installing an acoustic panel wall without damage is entirely within reach.
Go adhesive, go modular, and get clever with your layout, you’ll be surprised how easy it is to achieve professional results, even in a rented flat or shared office.